“Making your drums sound way more powerful in Pro Tools” is a title that a reader brought to my attention. People seem to be searching this topic in my blog quite often. Although I touched upon this a little bit in a post some time ago, and you might want to jump over and re-read that post first, and then please allow me to continue on with this topic.
The bottom line……
Never mind getting the best possible sounding drum kit right off the bat. Work at getting the best possible drum line, or performance that you can write. Try alternate times, switching parts around, and place importance on song dynamics. Building up tension, and then releasing it is the name of the game.
With the drums written, now you can consider the approach that you will use in order to fine tune the drums. The different approaches are vast in number, but in this post I will detail some of the most common.
If you are serious about your music, then you want to get the best sound entering the recording device as you possibly can, and by doing the least amount of work in order to get it. Why we record lame sounds and think we can fix it later in the mix is beyond me. But we all have done it. Think about this time tested chant “crap in, crap out”. That is just what someone said to me once, and it makes a lot of sense.
The term “Powerful drums” brings several different approaches to mind. These approaches may include EQ, volume, velocity, panning, effects, and the like. I suppose I should describe each approach to you, and then let you use them at your own discretion.
There are no two songs that are alike. Each song that you work on will need different ways of editing a drum sound. Learning each trick will add tools to your tool chest of ideas. Then you can use one or all of these ideas and add them to any of your songs that you wish. Learning to know what each idea will bring to your finished song is the key. You will learn just what “trick” a certain song could benefit from, and learn it in no time at all. However, never be afraid to try new things!
If you jumped over to the link that took you over to an older drum post, then you get the idea of panning your drum kits as if the listener is sitting on the drum throne. I will not bore you any longer on that idea. I have always tried to get the panning completed first, no matter what the tone or impact of the individual drum hits sounds like.
The next two ideas up my sleeve are to add EQ and compression, but not necessarily in that order. Compression can shave off some top end, or add some “wallop”. EQ is often added after such tools in order to bring back frequencies that were lost, but not as a rule.
You need to assess your type of drums (drum machine, real drum kit, ToonTrack Drum software, ect.) that are inputting into your audio recorder, in order to come up with a working signal effects routing path. This is just about critical in order to achieve getting your fat and powerful tone. You will develop a routine plan of attack all of your own, depending on where your drums actually come from each time. This will determine the exact protocol for the addition of EQ and Compression, and in just which order you will want to add these effects plus others.
Let me explain a few of the different processes.
Recording a real drum kit with microphones….
You might just be “summing” the microphones into a mixer, and exiting the mixer with a “stereo out” pair. This stereo pair probably then enters your recording device. I would most likely first run the stereo pair into a compressor in order to smooth out the spikes, and to bring in more of the drum kits tone. EQ’ing would come next. Make sure to then go straight into your recording device. Keep in mind that adding too much EQ and/or compression before the recording device can be a bad thing. Go light, as you will not be able to remove it later.
Drum machines straight to your recording device…….
Drum machines most often enter your recording device as a stereo pair, so routing them into the recording device is easy. However, drum machines and their quality of sound differ from unit to unit. Look at exactly what sort of sound is entering the recording device. Are the snares and kicks attacks entering the red line? Do the kit pieces sound good tone wise? Getting this information now will determine the plan of attack.
Most often times, recording your drum machine into your recording device dry will sound o.k., but not stellar. Listen to the drum machines onboard effects, and make a decision about using those effects or your favorite effects elsewhere. You must decide if you record the drum machine “wet” or “dry”. “Wet” is with effects, and “dry” is without. Either way is fine, but once again you can’t “undo” the wet in the recorded drum mix. Read on for more advice.
Recording drum machines “dry” and “wet”.
First, let’s take the recorded “dry” tracks and add some effects to them.
Using either an auxiliary bus approach to add the effects to the dry drum machine tracks, as an aux send return, in parallel, might just work fine. This adds the effected “fix” along with the recorded dry drum machine tracks, and records them together. This method allows us to dial in just the right amount of “fix to the mix” by adjusting how just much “dry versus wet” enters the final recorded track.
The other option, if you are sure just what the drum machine needs “right from the get go”, is to add the effects as they enter your recording device. This can be done by taking the stereo outs from the drum machine, to the recording device, and adding your EQ and Compression as the stereo pair are recorded.
This can be done as a series fix, or a parallel fix. Series is in “out one device and into another”, and parallel is recording all effects “to, and with” the dry signal, just like we did above. The difference is that we will not record the dry drum track.
The best and the safest way to fix “lame-o” drum machine tracks is to record them dry, and then fix them from there. Exactly how you accomplish this is going to become your style.
Software based or Midi drum tracks……
This is the easiest sort of drum track to alter and/or to add effects to, as there are so many different approaches in which to accomplish these chores. Here is how I like to do this.
I like to use a separate midi track for the drum lines, the fills, and the cymbals. This makes getting the separate velocity and volume levels perfect, and for the whole song.
Once your drum lines are written, consider using the drum software itself (the source for the drums) to complete all of the panning, EQ, volume, velocity, automation, and any other fixes that you might deem necessary. This will take care of most of the problems that might pop up in the drum mix. Using one “place” or one area to fix all of the troubles is a great idea. This makes your workflow easier to remember and simple to dial in.
With that finished, listen to what you are left with. What ever is troubling you now needs to be fixed in either one of two ways. You can fix it either before your drum tracks “see” the recording device (or in either series or parallel), or after they “see” the recording device. Let me take that principal further.
Recording the drum tracks with a compressor inline will smooth the transient spikes. If this is what you wished to fix, then do just that. If you like the audio, but think it needs just a touch more “tom tone”, then add your compression along with the dry signal via an aux send/return, and record a stereo pair from that send/return. That way, you will get the original and the compressed all mashed together in one stereo track.
You might need to return to the software in order to adjust some minor EQ fixes, after the compression is added, but don’t freak out, as I mentioned before “that happens”.
Avoid adding effects like delays and reverbs until your drum track is finished (as far as its impact and tone) and recorded. These effects might sound better if they are triggered from just one certain kit piece, or added to the kit as a separate auxiliary send/return track. Besides, adding such effects at each step along the way will cause them to add up, or pile up, linearly, and might just sound terrible! Use the same size reverbs, and apply them as few times as you must. The same is true for EQ fixes by the way.
Drums are often the first instrument recorded. How are you going to know if the effects are going to fit the song that you have started to write? Adding the effects after more and more of the separate parts are written is the way that I like to do things. That way, you are not stuck with a drum line that is too wet.
Stay tuned for part two of this series. I will discuss getting your recorded drums to sound as if they are being played live, sound coherent in the mix, and even sound more impacting over all.

Tuesday, October 13, 2009


Wednesday, October 7, 2009
Celemony “Melodyne plugin” review
I downloaded the Celemony Melodyne plugin from their website, and after several full days of use I feel compelled to tell you all about it! I can not wait to spread the news about this plugin any longer!
The first thing that crossed my mind after downloading the plugin was that, it was actually up and running on my PC in what seemed like only a couple of minutes. What I mean by that is that Melodyne was downloaded, registered, and open in my DAW, and in full operation! This sort of speed is a first for me. I think that says something about a well designed product. There was not a single downloading or registration “burp, glitch, or hitch” at all what so ever.
The first thing that crossed my mind after downloading the plugin was that, it was actually up and running on my PC in what seemed like only a couple of minutes. What I mean by that is that Melodyne was downloaded, registered, and open in my DAW, and in full operation! This sort of speed is a first for me. I think that says something about a well designed product. There was not a single downloading or registration “burp, glitch, or hitch” at all what so ever.
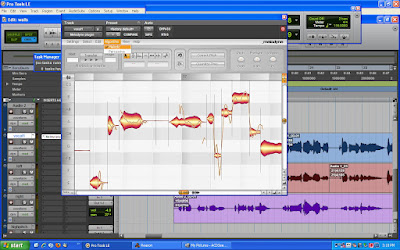
The very next thing that I noticed was that I was actually using the Melodyne plugin without reading a single word from the manual. Again, I couldn’t help but to tell myself that with a well designed product comes an easy to use interface. This is definitely the case with the Melodyne plugin from Celemony.
I have since gone back and read the manual. I wanted to learn each and every feature that the Melodyne plugin has. I want to “suck the marrow out of the bone” and then learn how to use the tools in Melodyne to the best of their (and my) ability. I need to understand just what is possible with using the Melodyne plugin. I am smiling from ear to ear right now as I have indeed learned just what it is that I can do with the Melodyne plugin. What is it that I learned about what the Melodyne plugin is capable of? Everything that I hoped and yet so much more!
So, just what is Melodyne?
The Melodyne plugin is audio editing software that operates in a “plugin form”. Melodyne allows the user to edit recorded audio. Using the Melodyne plugin is a fast and easy way to place your off pitch, sour notes perfectly in tune.
But that is just the beginning of its features. I also learned that I could move audio around in time, in pitch, shorten or lengthen each note, and I could even adjust the volume levels of each note too! I am just getting started with the features and the endless possibilities of this powerful tool! One thing is for sure, and that is that I can’t stop tweaking my older material to near perfection. Melodyne is so darn fast and so easy to use that I can’t stop using it!
Let me explain the Melodyne plugin experience in a little more detail.
You use the Melodyne plugin in your DAW, as a tracks’ insert. The Melodyne plugin only works on the audio that you “place”, or load into it. Celemony claims that unaffected (dry) signals work the best, so edit your tracks with the Melodyne plugin first and then add your delays and reverbs. Just so that you all know, I am using a RTAS version of Melodyne in ProTools LE8, and it is working flawlessly.
The process of inputting audio into the Melodyne plugin is simple. Heck, even a caveman could do it!
One thing that became obvious to me is that you need to make sure that you “tell” the Melodyne plugin weather the audio that you are inputting is percussion or melodic in nature. When I started playing with some audio that I had first loaded into the Melodyne plugin, I couldn’t get the advanced editing features to do what I wanted them to. I found out that this was the reason why. I had placed vocal audio into the Melodyne plugin, and I had told it that it was percussion. I learn by making mistakes sometimes, what can I say?
In order to load your own audio into the Melodyne plugin, one need only to place your cursor of your DAW at the beginning of the selection that you want loaded into Melodyne. Then by simply clicking the “play” button in your DAW the loading process starts. When the section of your audio to be loaded has finished, clicking on your DAW’s stop button ends the loading process. The Melodyne plugin is now ready to work for you.
There is a quick pause while Melodyne converts the information into note “blobs”. These “blobs” are what make editing in Melodyne so easy. But the converting happens so fast that if you blink you will never see it happening. In fact, the entire process of loading audio into the Melodyne plugin is fast and easy.
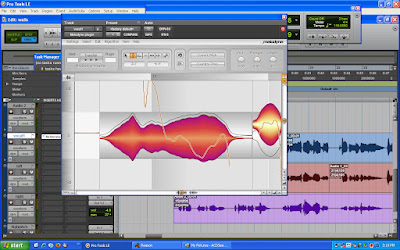
In this above image of the Melodyne plugin in use, you can see the faint outline of the “blob”, just above the “actual blob itself”. Melodyne shows where your sour notes should be by using these simple “blob outlines”. This is a handy feature for tuning notes fast! The amount that your audio is off is shown in the little box at the top. How cool is that?
Moving the notes (blobs) with the pitch tool is as easy as dragging them with your mouse. You can use the auto snap to grid feature, or move the notes freehand style. Holding the Alt. key while moving the notes’ blip will allow for free movement. I found that by reading the “Cents” indicator, and getting it to “zero out” was a great way to place a note perfectly in tune.
The layout of the Melodyne plugin is very easy to take in and just as easy to understand. The beauty of using the Melodyne plugin is that you can go as deep with your editing as you want to. Or, if you are better than me at singing, you can keep your workflow as simple as you need it to be.
This is really a cool thing because sometimes I only need to change one little note here, or one single drum hit there, and I don’t want to spend a lot of time editing the finest little detail about these single notes.
I found out that I could (and did) load up a sour vocal, edit the vocal notes pitch to their correct pitch, and then transfer this edited material back into the DAW in a few minutes flat.
I did this editing without even downloading or reading the manual! So believe me, the Melodyne plugin is very easy to use, and it works and sounds amazingly good.
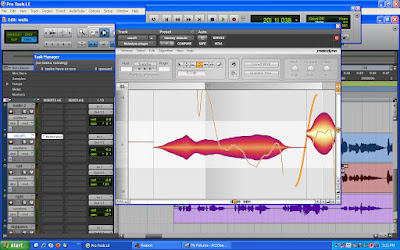
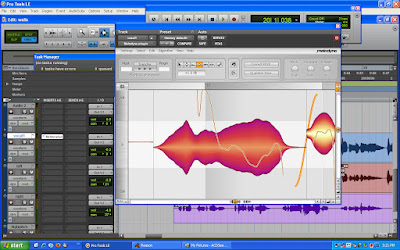
With the above two images, you can see that selecting and using the amplitude tool makes increasing or decreasing each note’s volume level a breeze. Clicking and dragging the mouse up or down is all you need to do. This is a great way to get a solo or even a vocal to sit evenly in the mix without compressing the snot out of it!
You can even use the Melodyne plugin to alter a notes timing troubles, quantize notes to a grid of time, or extend a note and/or shorten a note! The way in which the software is written does not make these altered notes sound funny at all, but instead they sound perfect. Do not expect to get any robotic sounding vocals from Melodyne, well, unless you want to make them. Even the stretching of a note sounds authentic!
All of these various types of edits (in Melodyne) can be made on a note-by-note basis, or by selection entire groups of notes! The Melodyne plugin separates the audio into regions, and I found it did a damn good job at separating words perfectly!
This “snap to grid” feature is great. Using your “Alt.” key along with the mouse allows exact placement of a note. The interface supplies a numerical readout of positive and negative cent values for each note as you place/move a “blob” on the Melodyne plugin interface. The ability to program in a key and then using the snap to feature made my editing workflow a joy to perform.
Click HERE to jump over to the Celemony website, and give the Melodyne plugin a new home in your studio. Using the Melodyne plugin will shave time from your workflow. I have not used a plugin before that offers such precision adjustments in volume levels, time, and pitch, and all with such speed and ease. Bravo! I give Melodyne the coveted “two guitar pics way up!”
HERE and HERE are some great and informative video demos from Celemony. These will get you “in the know” with speed.
Eric Oliver, on behalf of Expert Village, has also posted some great videos of himself using the Melodyne plugin! Here is the link to just some of them…….
Once more I need to thank you for stopping by. Make sure to either bookmark this blog or subscribe right now. I don’t want you to miss out on any of the exciting news, reviews, and how to’s that I post!
Friday, October 2, 2009
Getting your music heard, part three.
Give what you love most away. If it is good, it will come back to you, ten fold.
Perhaps in today’s existence of fame (and greed), one most often overlooked avenue is donating. There are a host of different people that are always looking for audio. These people need your original material for placement in to their creative works.
Radio, TV, indie films and shorts, and even many tutorial DVD artists are in need of music. Donating some material to these efforts can land you a win/win situation. What is wrong with placing your masterpiece into a radio ad anyway? Imagine hearing your own jingle being played in the background of a used car commercial. Perhaps it is not the most glamorous outcome for your hard work, granted, but the nice act of a single donation will put your foot in the door.
If your donation is chosen, than you will get the almighty credit. Your information will roll in a credit reel somewhere, and someone will see it. Radio stations will ask you for more work. Television broadcast networks will be bidding against each other for your loyalty. Well, maybe I am getting caught up in the hype, here, but you get the idea.
How many of you can actually say “My work can be heard on (place popular radio/television station here)”? I can’t yet say that, but I plan on being able to. Some of my images have popped up in local papers, ads, and campaigns. This was made possible by donating work to some local charities that I believed in. Talk about giving back! A single act of charity can help feed you for the rest of your life, if you play it right!
Speaking of giving things away……
Placing one of your songs or jingles onto a site that supports free downloads for everyone will only help to get your name and your work noticed. Here is just one of the sites that I put new material onto. I let the new works go onto the free digital download domain for a limited time. Then, I either replace the file with a new one, or I start charging a small fee for the original file. You can create quite a buzz by just doing this!
By joining a free digital download site (like Myspace, ITunes, Put it on) you are doing the right thing. However, putting your work one of these sites is only the beginning of the job.
Surfing others sites is next in line. Locating others sites that resemble your own genre should be your next task. Go ahead and place some comments onto their site. Explain to these other folks how much you enjoy their efforts, congratulate them with a nice comment, explain to them just how close your music is to theirs, and most importantly leave links to your site.
The reason that we do all of this messaging is not to just be nice people. We are creating an online personality of sorts. Plus, so many people will read those comments that you left for others that it will stun you. Your own sites’ traffic will increase ten fold.
But just which sites or page profiles do we comment on?
Finding the “closet related musically” and then the most visited and most popular sites to comment on is the key here. Popularity of other sites is critical, but second only to relative genre. People that enjoy one site should appreciate the link to your site that you left. They might even return the favor! But do not send people to your site, from another site, if it is not even close to the same style of writing! You do not want to send listeners on a wild egg hunt. They will remember you.
So what is it that I am going to do with this information?
I am going to find some new and popular sites to upload my work onto. I will supply them for free, but only for a limited time. I will place comments with links back to my stuff onto others sites.
I thought back to an adventure in donating that I took with a local blogger and professional photographer. This friend requested that I record his vocal message for future clients, and then cut and paste his message to flow with background music and a photo slide show that showcases his work. His intent was to use it on his business website. We met and I recorded him talking. After a little cut and paste work, the vocals matched the slide show nicely. I was happy to get the experience doing this sort of venture, and my friend gained a nice opening show on his site. He does very good work, eh?
This very thing is what I am looking to do for others.
I am currently seeking out a couple of local television/video production companies to see if I can donate my time and/or talent to them. I am also seeking some local charities that might just need a slogan, jingle, or soundtrack for an up and coming production. I will write down and/or blog about what I find out, and then I will post it here, on Home Recording Weekly.
Lastly, some success in my search for talent.
Placing an ad on Craigslist has brought me great results, time and time again. From photo to music, people look on Craigslist! With that said, I placed an add looking for a singer or two, and asked for links to their stuff. I wanted to find what I thought might be the best fit for my music genre. Many good folks, looking to take a risk, have responded.
I am pretty certain that out of the group of volunteers two have really attracted my attention. One is a 20 something year old man, the other, a 20 something year old woman. What caught my eye, or ears, were their hook laden music style. They are young and can bring a fresh voice to the table. Well, that is if they like my material. I will continue to post updates, as well as some behind the scenes stuff!
You do not want to miss out on any of these easy to apply ideas and tips. Do yourself the favor and subscribe right now. This will guarantee that you learn all you can about getting your music heard. Bookmarking this blog will also get you closer to your goal. Thanks for stopping by, and keep on keeping on! The world needs to hear you!
Perhaps in today’s existence of fame (and greed), one most often overlooked avenue is donating. There are a host of different people that are always looking for audio. These people need your original material for placement in to their creative works.
Radio, TV, indie films and shorts, and even many tutorial DVD artists are in need of music. Donating some material to these efforts can land you a win/win situation. What is wrong with placing your masterpiece into a radio ad anyway? Imagine hearing your own jingle being played in the background of a used car commercial. Perhaps it is not the most glamorous outcome for your hard work, granted, but the nice act of a single donation will put your foot in the door.
If your donation is chosen, than you will get the almighty credit. Your information will roll in a credit reel somewhere, and someone will see it. Radio stations will ask you for more work. Television broadcast networks will be bidding against each other for your loyalty. Well, maybe I am getting caught up in the hype, here, but you get the idea.
How many of you can actually say “My work can be heard on (place popular radio/television station here)”? I can’t yet say that, but I plan on being able to. Some of my images have popped up in local papers, ads, and campaigns. This was made possible by donating work to some local charities that I believed in. Talk about giving back! A single act of charity can help feed you for the rest of your life, if you play it right!
Speaking of giving things away……
Placing one of your songs or jingles onto a site that supports free downloads for everyone will only help to get your name and your work noticed. Here is just one of the sites that I put new material onto. I let the new works go onto the free digital download domain for a limited time. Then, I either replace the file with a new one, or I start charging a small fee for the original file. You can create quite a buzz by just doing this!
By joining a free digital download site (like Myspace, ITunes, Put it on) you are doing the right thing. However, putting your work one of these sites is only the beginning of the job.
Surfing others sites is next in line. Locating others sites that resemble your own genre should be your next task. Go ahead and place some comments onto their site. Explain to these other folks how much you enjoy their efforts, congratulate them with a nice comment, explain to them just how close your music is to theirs, and most importantly leave links to your site.
The reason that we do all of this messaging is not to just be nice people. We are creating an online personality of sorts. Plus, so many people will read those comments that you left for others that it will stun you. Your own sites’ traffic will increase ten fold.
But just which sites or page profiles do we comment on?
Finding the “closet related musically” and then the most visited and most popular sites to comment on is the key here. Popularity of other sites is critical, but second only to relative genre. People that enjoy one site should appreciate the link to your site that you left. They might even return the favor! But do not send people to your site, from another site, if it is not even close to the same style of writing! You do not want to send listeners on a wild egg hunt. They will remember you.
So what is it that I am going to do with this information?
I am going to find some new and popular sites to upload my work onto. I will supply them for free, but only for a limited time. I will place comments with links back to my stuff onto others sites.
I thought back to an adventure in donating that I took with a local blogger and professional photographer. This friend requested that I record his vocal message for future clients, and then cut and paste his message to flow with background music and a photo slide show that showcases his work. His intent was to use it on his business website. We met and I recorded him talking. After a little cut and paste work, the vocals matched the slide show nicely. I was happy to get the experience doing this sort of venture, and my friend gained a nice opening show on his site. He does very good work, eh?
This very thing is what I am looking to do for others.
I am currently seeking out a couple of local television/video production companies to see if I can donate my time and/or talent to them. I am also seeking some local charities that might just need a slogan, jingle, or soundtrack for an up and coming production. I will write down and/or blog about what I find out, and then I will post it here, on Home Recording Weekly.
Lastly, some success in my search for talent.
Placing an ad on Craigslist has brought me great results, time and time again. From photo to music, people look on Craigslist! With that said, I placed an add looking for a singer or two, and asked for links to their stuff. I wanted to find what I thought might be the best fit for my music genre. Many good folks, looking to take a risk, have responded.
I am pretty certain that out of the group of volunteers two have really attracted my attention. One is a 20 something year old man, the other, a 20 something year old woman. What caught my eye, or ears, were their hook laden music style. They are young and can bring a fresh voice to the table. Well, that is if they like my material. I will continue to post updates, as well as some behind the scenes stuff!
You do not want to miss out on any of these easy to apply ideas and tips. Do yourself the favor and subscribe right now. This will guarantee that you learn all you can about getting your music heard. Bookmarking this blog will also get you closer to your goal. Thanks for stopping by, and keep on keeping on! The world needs to hear you!
Sunday, September 27, 2009
ToonTrack Custom and Vintage SDX, and Electronic EZX are released!
Do you want to own the most original sounding recordings on Earth? Then you will want to take a minute and check out these two awesome new releases from the good folks at ToonTrack.
At a time when drum sequencing and drum sample technology is improving so rapidly, we should not be shocked by the next big thing. However, ToonTrack has a reputation of releasing very high quality products that are rather simple to incorporate into your musical ventures. When ToonTrack speaks, I listen. Speaking of listening, if you wish to hear ToonTrack "EZ Drummer 2.0" software in action, listen to this, a song written by myself.
The EZ series of drum software from ToonTrack is perhaps the easiest of them all to use. The best part, of course, is that all of their products sound great! The Superior series is also easy to use but it does allow for a lot more customizing of the kits pieces. Here is a link to a post that goes into more detail.
ToonTrack has released one new kit (midi loops and sound samples) under their EZ series, and one under their Superior line. These two kits are the Custom and Vintage SDX and the Electronic EZX. Let’s dive in and see just what is inside these two new products!

First up is Electronic EZX. I just am happy to see ToonTrack take the bold departure from the norm, and supply us sound geeks with such a rich and unique set of samples and midi loops. Here is a quick jump to ToonTrack Electronic EZX demo video, and some recorded works for you to listen to. The samples bring me back to a fun and exciting youth. Good stuff!

ToonTrack didn’t forget the hardcore, vintage drum kit, custom tweaking gurus, hard to find sound file nuts out there either. With the release of ToonTrack Custom and Vintage SDX you all can now own some of the rarest, hardest to find drum kit pieces of all time! Here is a link to the videos and the sound files for the Custom and Vintage SDX so you can hear the pieces for yourself!
Make sure that you bookmark or subscribe to Home Recording Weekly, as you certainly do not want to miss out on the current news or reviews that are posted here! Thanks for visiting, see you again soon!
Saturday, September 26, 2009
Getting your music heard, part two.
We all have a different goal in mind. A goal is different than a dream. The difference is that a goal requires that a person come up with a plan that details the steps involved in obtaining a goal. A plan directs the path that we take in order to achieve our musical goals. Having a goal in mind, and a plan that will take us to that goal is what keeps us plugging away at our craft, day after day.
For some of us the goal is to complete a project that they are currently working on with, or for others. Yet for some others the goal is to simply get that song out of their head and onto the world’s ears. Whatever your goal is, you must take each step and inch closer and closer to the completion of your musical goal.
My goal is to get my home recordings into the hands (or ears) of some people that will give me some honest feedback. I have a burning desire to learn just where my music stands. Is my stuff worthy of submitting for use in radio and T.V. jingles? How about the recordings quality itself? Can I assume that these demos of mine are ready to be pitched at all? Great questions, if I do say so myself.
So, with a goal stated, I then moved on to defining the steps that I would now take in order to reach this goal of mine. I want answers to these questions. The catch is that I do not have a ton of cash to tie up in the music industry. In fact, I have very little.
What could I do in order to get my stuff heard by the very people that know how to listen? How am I going to obtain this much needed feedback? The answers are all around us, especially in this, the digital age.
First of all, I decided to target the lowest costing methods in which to get closer to achieving my goal.
One method that I decided to try is song writing contests. In particular, I would target the song contests that are cheap to enter and that offer little more than a pat on the back to the winners.
Contests that offer all kinds of cash and prizes are perfect for some, but not me. These contests also require a stiff entry fee. I would be competing with millions of folks that enter these sorts of contests for perhaps the income potential of them. I am not at that level. I can not afford to hire musicians, singers, and rent studio space to do it all in. I figure winning these contests is akin to winning a “musical lottery”.
With cost and the competition in mind, I chose some “almost free” song contests to enter. The reasons for entering are to get my music heard by professionals, and to obtain their feedback. This will let me know where I stand. Plus, if I come in close to the top, I will then have my name, song, and links posted on a site other than my own! This is worth more than I could ever afford to pay for!
One contest that caught my eye is the Songbird monthly songwriting contest. The entry fee is just one dollar! Heck, even a poor musician like me could cough up the one dollar entry fee in exchange for the press that the winner will receive in return. This was a no brainer. If you have not been to the Songbird site, follow the link provided and please go ahead and submit a song or two! Did I mention that as well as all of the “press”, the winner receives fifty dollars? That aint a lot in most folk’s eyes, but it is better than a broken guitar string.
Next up, the radio!
How much would you pay to have your song played over the air waves? How about if it were free? It’s true that in everyplace that I have ever been, there is at least one radio station “within pick up range” that hosts a local music show. This will not make you a star, but it will get your name, links, and music out there. I have had the good fortune to be picked, and then played on two radio stations. The feedback was limited though, as the DJ’s would never say anything negative about our work. However, it would not be a good idea to play only the bad songs on the air. Getting picked is quite an honor all by itself.
Seek out the radio stations that support the local artists and then submit your songs. Now, before you dismiss this idea, take a second and think about how many radio stations there are that might host a local music show, past your local broadcast area. With the uploading style of MP3’s, a song can be submitted in seconds! The radio stations that I have been played on still have a link to my information posted on them to this very day. What is the worst that could happen? You might just get your foot in the door!
These ideas are just a couple in my plan of attack. Stay tuned to the Home Recording Weekly blog to see some others. Feel free to submit to me some of your ideas, and I will be sure to post them, and your links. Please feel free to subscribe, and/or bookmark this blog. You do not want to miss a single post! Thanks so much for stopping by, and for your ideas.
For some of us the goal is to complete a project that they are currently working on with, or for others. Yet for some others the goal is to simply get that song out of their head and onto the world’s ears. Whatever your goal is, you must take each step and inch closer and closer to the completion of your musical goal.
My goal is to get my home recordings into the hands (or ears) of some people that will give me some honest feedback. I have a burning desire to learn just where my music stands. Is my stuff worthy of submitting for use in radio and T.V. jingles? How about the recordings quality itself? Can I assume that these demos of mine are ready to be pitched at all? Great questions, if I do say so myself.
So, with a goal stated, I then moved on to defining the steps that I would now take in order to reach this goal of mine. I want answers to these questions. The catch is that I do not have a ton of cash to tie up in the music industry. In fact, I have very little.
What could I do in order to get my stuff heard by the very people that know how to listen? How am I going to obtain this much needed feedback? The answers are all around us, especially in this, the digital age.
First of all, I decided to target the lowest costing methods in which to get closer to achieving my goal.
One method that I decided to try is song writing contests. In particular, I would target the song contests that are cheap to enter and that offer little more than a pat on the back to the winners.
Contests that offer all kinds of cash and prizes are perfect for some, but not me. These contests also require a stiff entry fee. I would be competing with millions of folks that enter these sorts of contests for perhaps the income potential of them. I am not at that level. I can not afford to hire musicians, singers, and rent studio space to do it all in. I figure winning these contests is akin to winning a “musical lottery”.
With cost and the competition in mind, I chose some “almost free” song contests to enter. The reasons for entering are to get my music heard by professionals, and to obtain their feedback. This will let me know where I stand. Plus, if I come in close to the top, I will then have my name, song, and links posted on a site other than my own! This is worth more than I could ever afford to pay for!
One contest that caught my eye is the Songbird monthly songwriting contest. The entry fee is just one dollar! Heck, even a poor musician like me could cough up the one dollar entry fee in exchange for the press that the winner will receive in return. This was a no brainer. If you have not been to the Songbird site, follow the link provided and please go ahead and submit a song or two! Did I mention that as well as all of the “press”, the winner receives fifty dollars? That aint a lot in most folk’s eyes, but it is better than a broken guitar string.
Next up, the radio!
How much would you pay to have your song played over the air waves? How about if it were free? It’s true that in everyplace that I have ever been, there is at least one radio station “within pick up range” that hosts a local music show. This will not make you a star, but it will get your name, links, and music out there. I have had the good fortune to be picked, and then played on two radio stations. The feedback was limited though, as the DJ’s would never say anything negative about our work. However, it would not be a good idea to play only the bad songs on the air. Getting picked is quite an honor all by itself.
Seek out the radio stations that support the local artists and then submit your songs. Now, before you dismiss this idea, take a second and think about how many radio stations there are that might host a local music show, past your local broadcast area. With the uploading style of MP3’s, a song can be submitted in seconds! The radio stations that I have been played on still have a link to my information posted on them to this very day. What is the worst that could happen? You might just get your foot in the door!
These ideas are just a couple in my plan of attack. Stay tuned to the Home Recording Weekly blog to see some others. Feel free to submit to me some of your ideas, and I will be sure to post them, and your links. Please feel free to subscribe, and/or bookmark this blog. You do not want to miss a single post! Thanks so much for stopping by, and for your ideas.
Monday, September 21, 2009
Getting your music heard.
If you are like me (and I assume that you are if you have come to visit this blog) you have a knack for writing, performing, and recording your own original music. I have tried to explain how much I enjoy chipping away at a riff, or a melody that plays itself in my head, over and over until it gets recorded. Slowly but Shirley, as we layer sound texture on top of sound texture a song takes shape. Using our signature tricks and tones, we craft our masterpieces to be uniquely and unmistakably our own.
I have recently felt “a calling”. I decided to get real and put a fair amount of skill and most of my time into recording an albums worth of material. I have had the songs outlined, and roughed out on ProTools, but they needed so much more. There were solos to get just right, bass lines to smarten up, and lots and lots of drum fills to score. This would be a journey, and I had made the decision to set off.
I had a burning passion to get this music out from deep within, and into a format that I could share with the rest of the world. Days soon turned into months. People wondered where I had gone. I have been working day in and day out, almost to access. But it wasn’t like work at all, but an obsession.
Well, now the end is near. Often times I find myself tweaking this or that little effect, or adding a little EQ on this or that, but for the most part the collection is finished. Twelve or thirteen songs are now in the mp3 format, and ready for the next stage of their existence. It is true that most of these songs have no vocals, but I plan on recruiting some help on that front. I lack the ability to sing well, but singing is a large part of a song. How else does one get their ideas or emotions out to the listener? However, the songs are good, rather good I think, in quality and in originality.
Here is the problem.
What do I now do with the songs? Have you ever come across this problem at this point in the game? I was so focused on getting the songs recorded to the best of my ability that I didn’t even think about what I would do with them at the conclusion of the recording process.
I have had my music played on the radio. I can’t describe to you the joy that it brought me to hear my work over the air waves. That was really a cool time. I have also uploaded some of my older material to several different indie music sites, with little to no excitement. Granted, the quality of those songs is not as good as the ones that I have recently finished, but the idea of the songs got across.
Basically what I am getting at here is “where do we turn in order to obtain some much needed feedback”, and dare I say, “Where do we head to as we seek professional listeners”?
This is a time like no other in history. I know that we all have the ability to get ourselves heard by masses and masses of people, via the internet. One only need look to the web to witness the inspiring overnight success stories that have come to see the light of day. How can we forget the infamous YouTube favorite “Chocolate Rain”? This is only one example in a long line.
One common problem that I have is that after visiting only three or four indie bands MySpace and Face Book page visits, I have heard enough. I wonder, “Would another person find me in this same way?” The answer must be “Probably not”.
My music is in demo quality. “Demo quality” has come to mean quality, by the way. Moby, like so many others, have not only written but also have recorded their music in bedroom studios. With all of the computer software and awesome DAW’s available to anyone with a modest income to spend, one only need put in the time in order to get a good sounding song.
However, “Demo quality” is not radio ready, not by a long shot. I feel that I should offer up the truth that I wish to sell my songs, not my performances. It is getting the right people to listen to my material that I am seeking advice on.
The solution.
What I have planned is nothing short of a full-on assault on the music industry, using some of the many methods that we all have available to us. Go ahead right now and bookmark this site or subscribe to this blog, and follow along with me on my journey. I will detail each and every effort that I make, detail what is involved in the steps that I take, and I will detail what I find out from taking the steps that I will take. If you want to learn how to get your music heard, than you will want to follow this blog.
If you are in the same musical place that I am, than you should be subscribing right now! By following along you will find out what works and what does not. I will share with you my best ideas, and also the many bad ideas. I will share the costs of these ventures, the results, and the many different methods that I will use to get my music heard and to get my name out there. Won’t you join me?
I have recently felt “a calling”. I decided to get real and put a fair amount of skill and most of my time into recording an albums worth of material. I have had the songs outlined, and roughed out on ProTools, but they needed so much more. There were solos to get just right, bass lines to smarten up, and lots and lots of drum fills to score. This would be a journey, and I had made the decision to set off.
I had a burning passion to get this music out from deep within, and into a format that I could share with the rest of the world. Days soon turned into months. People wondered where I had gone. I have been working day in and day out, almost to access. But it wasn’t like work at all, but an obsession.
Well, now the end is near. Often times I find myself tweaking this or that little effect, or adding a little EQ on this or that, but for the most part the collection is finished. Twelve or thirteen songs are now in the mp3 format, and ready for the next stage of their existence. It is true that most of these songs have no vocals, but I plan on recruiting some help on that front. I lack the ability to sing well, but singing is a large part of a song. How else does one get their ideas or emotions out to the listener? However, the songs are good, rather good I think, in quality and in originality.
Here is the problem.
What do I now do with the songs? Have you ever come across this problem at this point in the game? I was so focused on getting the songs recorded to the best of my ability that I didn’t even think about what I would do with them at the conclusion of the recording process.
I have had my music played on the radio. I can’t describe to you the joy that it brought me to hear my work over the air waves. That was really a cool time. I have also uploaded some of my older material to several different indie music sites, with little to no excitement. Granted, the quality of those songs is not as good as the ones that I have recently finished, but the idea of the songs got across.
Basically what I am getting at here is “where do we turn in order to obtain some much needed feedback”, and dare I say, “Where do we head to as we seek professional listeners”?
This is a time like no other in history. I know that we all have the ability to get ourselves heard by masses and masses of people, via the internet. One only need look to the web to witness the inspiring overnight success stories that have come to see the light of day. How can we forget the infamous YouTube favorite “Chocolate Rain”? This is only one example in a long line.
One common problem that I have is that after visiting only three or four indie bands MySpace and Face Book page visits, I have heard enough. I wonder, “Would another person find me in this same way?” The answer must be “Probably not”.
My music is in demo quality. “Demo quality” has come to mean quality, by the way. Moby, like so many others, have not only written but also have recorded their music in bedroom studios. With all of the computer software and awesome DAW’s available to anyone with a modest income to spend, one only need put in the time in order to get a good sounding song.
However, “Demo quality” is not radio ready, not by a long shot. I feel that I should offer up the truth that I wish to sell my songs, not my performances. It is getting the right people to listen to my material that I am seeking advice on.
The solution.
What I have planned is nothing short of a full-on assault on the music industry, using some of the many methods that we all have available to us. Go ahead right now and bookmark this site or subscribe to this blog, and follow along with me on my journey. I will detail each and every effort that I make, detail what is involved in the steps that I take, and I will detail what I find out from taking the steps that I will take. If you want to learn how to get your music heard, than you will want to follow this blog.
If you are in the same musical place that I am, than you should be subscribing right now! By following along you will find out what works and what does not. I will share with you my best ideas, and also the many bad ideas. I will share the costs of these ventures, the results, and the many different methods that I will use to get my music heard and to get my name out there. Won’t you join me?
Monday, September 14, 2009
IK Multimedias Metal guitar amp simulation review.
Once again I have had the good fortune to review another incredible product from IK Multimedia. This review is of IK Multimedia Metal guitar amp/cabinet/microphone simulator.

But just what is Metal?

Metal is a software plug-in (VST and/or an RTAS) for your favorite recording software. It acts and sounds just as a guitar amplifier and cabinet combination would, with all of your favorite pedals included too! But there is so much more to Metal that one needs to dig in and look deeper. Metal contains all sorts of gadgets; in the form of knobs, sliders, rack effects, a tuner, and some awesome guitar pedals.
After uploading IK Multimedia Metal onto your recording computer (Mac or PC) all you will then need to do in order to start making music is to plug your electric guitar into a computer digital interface of some sort. That’s it!
The end result? One heck of an awesome guitar amp/cabinet selection that will transform your guitar riffs and guitar licks into pulsating, pounding, full-on metal assaults!
I have not ever been in a heavy metal rock band. I have, however, written some heavy metal songs. So now I had the opportunity to use IK Multimedia Metal just to see how well it stacks up against some of the most heavy metal guitar tones of all time. To make a long story short, it stacks up just fine. With all of the included rack and stomp pedal effects in Metal I had no trouble at all getting very distinct metal guitar tones. If you consider the difference in cost between the real thing verses Metal, the solution is a no brainer.
If you are like me, a true guitar tone designer, then you will love Metal. I found that using Metal in order to obtain some very dirty guitar tones that are remarkably close to some of my favorite Metal bands (Metallica, Ozzy, and AC/DC) was amazingly easy! You can even “put together” your dream amp with Metal, with the choice of selecting all kinds of amp styles and types including everything right down to guitar amp tube types!
Putting together a recording “dream guitar rig” is also made easy with Metal. Metal software includes some great user pre sets that you can audition, and alter to your demanding tastes. The user presets are not only a great starting place, but they sound great by themselves too!
Playing thru two complete guitar rigs at the same time is also possible in Metal. This is what peeked my interest due to an obsession with getting that hard hitting, yet “note articulate” guitar tone. One dirty channel and one heavy distortion channel is what this tone is all about. Metal is fast and easy to use in order to get whatever tone your “mind hears”.
The included stomp pedals that come in Metal are great in tone, and pretty cool looking too. I like the little extras sometimes, what can I say? Metal is full of these extras it seems. Every effect, weather stomp pedal or rack type, is very well laid out, very easy to adjust, come loaded with user presets, and they look great to boot! Having everything so well laid out and easily adjustable sure makes finding that one particular tone a breeze. However I found it hard to stop at just “good” and I seem to keep on tweaking this or that, and go on adding on more and more effects.
I don’t like to read a lot of different manuals in order to make music. Soon after Metal was installed I was jamming. No need to read a single page of any manual at all. This sums up the ease of use for Metal, but let me give some more examples.
The user interface in Metal is easy to navigate and getting to just where you want to be is as fast as a click of the mouse. A collection of buttons up in the upper right hand part of the user interface makes changing to the different screens fast. Finding and tweaking that certain effect is easy due to pop up lists; in both the rack effect section, and the stomp effect section. The same is true with the auditioning of the many user presets for the amps, cabs, microphones, and effects. Well done IK Multimedia!
To wrap up this review, I would reccomend that you follow the links posted here and listen for yourself. The videos on IK Multimedias site will give you an idea of what you can expect from Metal. Bottom line is that if you are a Metal head guitar player, wather live or in your home recording studio, Metal might be the best plug in out there for your tones. It sounds great, works fast, and is sooo diverse. Get it!
What follows below are some screen shots of Metal that detail the many screens that make up the interface. I could not place them all on this post as it would be way too many.
The many stomp pedal effects.
What follows below are some screen shots of Metal that detail the many screens that make up the interface. I could not place them all on this post as it would be way too many.
The many stomp pedal effects.


A couple of the amp types.


Subscribe to:
Posts (Atom)