
I would like to explain the two ways that I most often use sends and retrns to add effects to multiple tracks. I am talking specifically about adding the same effect to multiple tracks. This, in this case, will be the seperate pieces that make up a set of drums, in order to make the drums sound as if they are not written with a computer, but in fact in a studio using real drums and a drummer.
The other day I found myself going through some older songs that I have recorded some time ago, using Reason and Pro Tools. Often times I work fast to get the tracks down before they are forgotten, and add the effects and critical panning later on. In these two examples, the songs were captured in this raw form, and then tweaked as I found the time.
Here, I opened up a song that was started ealier in the month. I was trying to squeeze every nuance of tone that I could get out of each note as well as adding some impact to the instruments. All that these songs needed at this point were some basic effects added using effect “send and return loops” through the use of buss tracks, and some other simple tricks that we all can easily enough perform. It all comes down to some basic routing of the tracks.
The simple efforts and ideas contained in today’s blog post are fast and easy to perform, but sound rich and professional!
First up is a cover tune. I have always wanted to try my hand at recording a song from our past that might sound cool as a modern re-make. The song that I have chosen has been locked away in my mind and reserved for this fate for several decades now.
First up is a cover tune. I have always wanted to try my hand at recording a song from our past that might sound cool as a modern re-make. The song that I have chosen has been locked away in my mind and reserved for this fate for several decades now.
Why has it taken so long to record it? The answer is that I didn’t want to even start this project until I was sure that it would sound different enough from the original yet also be just recognizable. I did not want to simply lay down tracks that were done decades ago. I wanted this re-make to be as modern and hip sounding as possible, yet remain memorable to the listener.
The song that I have been working on is titled “Miracles”, but it is actually copied from “You sexy thing”, which was written by Hot Chocolate lead singer Errol Brown sometime around 1975. Errol Brown was the lead singer of Hot Chocolate, and they recorded the hit in the United Kingdom.
As just as a piece of trivia for you all, this song was placed on the “B side” of the 45 rpm record because the record company was not sure of its strength as a single. Placed, instead, on the “A side” was a song named “Blue Night”. “You sexy thing” has been re-made by numerous other acts, almost since it’s’ release in 1975. This is probably due to both the killer guitar riff and the racy lyrics (racy for 1975).
I really do love the guitar riff that makes up this songs’ chorus! It is one of the most recognizable guitar parts ever written. My version of “You sexy thing” is titled “Miracles”, and it opens with this very same awesome guitar riff.
I decided that the opening riff needed to be as bold and as powerful as I could get it. I also wanted it to sound as if one band could play the song live, if needed. So, I played, doubled, tripled, and quad rippled the guitar riff using different guitar parts and guitar tones. My re-make contains verses that are purposely simple, and are basically built from two chords being plucked; string by string rather slowly. I decided to include a bridge into this fun version of a classic as well, again using only two chords. After the climatic bridge the song resolves back into that powerful and timeless guitar riff that just lives on and on.
Enough about the song itself; let me tell you what I have done in order to tune it up!
Well, for starters I like my songs to be as realistic to the listener as I can possibly get them. Let’s start with the back bone of a song, which I feel is the percussion. This songs percussion parts were recorded using Reason, all of which I programmed in note by note. This allows me to tune up each piece of the drum kit separately, as I write them. This basically means that I play with all of the settings (in Reason) such as tone, velocity, length, and volume. I do copy and paste arrangements, once a bar or two is completely written. This ensures that the song has a certain feel or continuity to it. Besides, coppying and pasting is the fastest way to write songs.
Each piece of the drum kit gets its own track once it crosses into Pro Tools. I send the kits pieces straight to the Reason patchbay, and then each patch goes out to a single track in Pro Tools. This allows me to adjust each and every nuance of each piece of the drum kit, such as volume and panning, easily and accurately. Plus, I can mute or solo each part of the drum kit too.
I can add an effect to any single piece of the drum kit but adding the effect to just that track. Also, if I decide to add any effects to several of the drum kits pieces, I can simply use an auxiliary track, for an effects “send/return” track. Each piece of the kit can be fine tuned with the exact same effect by adjusting the “busses’ send out” volume level of the separate tracks. But more on that stuff in the paragraphs that follow.
After I feel good about a drum line, and have copied and pasted together enough notes to make up a song , it is time to “make it sound real”. I like to solo the drums pieces and pan them to the left and right of center, as if the listener is actualy sitting on the drum throne. I like the hi-hat cymbals (open and closed) to be placed to my left; in the stereo sound field. I like the snare and the bass kick (or the bass drum) to be more or less in the center of the stereo field. All of this attention to detail really comes together and starts to pop when you set the toms more to the right side of the field. Setting the higher tuned drums close to center right, and the lower tuned ones more and more to the hard right seals the effect together. Cymbals get the same treatment, using a simple minds eye image of your favorite drum kit.
Placing the individual pieces in a realistic stereo sound field makes it a little bit easier to adjust the independent volume levels. This is a simple yet very cool idea, as any thing that we can do in order to make our digital drums sound “more humanistic” is a big plus. Next, if your kit is sounding way too dry, add some effects using a send/return track.
Placing the individual pieces in a realistic stereo sound field makes it a little bit easier to adjust the independent volume levels. This is a simple yet very cool idea, as any thing that we can do in order to make our digital drums sound “more humanistic” is a big plus. Next, if your kit is sounding way too dry, add some effects using a send/return track.
The kick drum track seems to always need some bottom end. I love a thud, followed by some deep bass, with each strike of the kick drum. A slight delay can make the kick fatter, or “thudier”, if you will. Also some slight compression can roll off the impact of the strike, and better pronounce the subtle sustain of the kicks’ note.
In the song “Miracles” I new that the kick drum needed some help. It sounded flat and lame. I decided to use two different methods of effects routing in order to enhance its’ sound. First, I used an all wet path, or in line processing, in order to add a much needed delay. I used an all wet path because the signal needed it to be applied to 100 percent of its sound. In other words, I wanted to change the kick drums sound as a whole.
In the song “Miracles” I new that the kick drum needed some help. It sounded flat and lame. I decided to use two different methods of effects routing in order to enhance its’ sound. First, I used an all wet path, or in line processing, in order to add a much needed delay. I used an all wet path because the signal needed it to be applied to 100 percent of its sound. In other words, I wanted to change the kick drums sound as a whole.
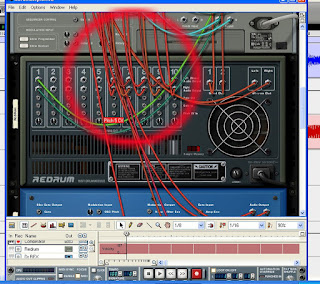
This image shows the back side (press the "tab" button) of the Redrum insert of Reason. I am showing that I patched the drum instruments pieces individally into the patchbay at the top.
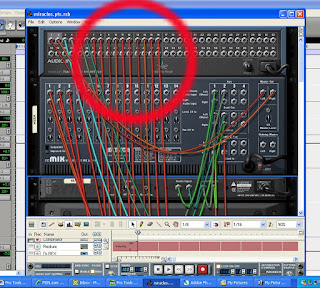
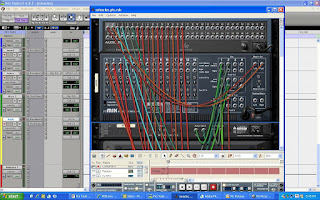
This image is of the same thing, just scrolled up to show the patch bay better. The corresponding numbers of the patchbays inserts are selected on seperate tracks in Pro Tools. The third image, below, better shows the tracks in Pro Tools.
Secondly, I used an effects loop to add some room reverb. The room reverb is also used by all of the remaining pieces of the kit in order to tie them all together, in sound. The loop is not in Pro Tools though, it is located in Reason. I used the Reason mixers send/return to buss in the reverb. I adjusted the amount of reverb coming into Pro Tools in the Reason mixer too, using the “Aux 1” post in each drum pieces channel.
Using an Auxillary track as an effects send and/or return.
Sometimes I like to create a new auxiliary track as a place for the drums’ effect loops. Make sure that you select the new auxiliary tracks’ input from a buss (say buss 2 for example) and assign the buss send on track that has the drum kits’ piece on it. Create the loop and then adjust all of the effects and effects parameters that you desire in this, the auxiliary “effect send/return loop” track. The volume slider found by clicking on the buss send assign, found in the drums piece track, will adjust how much of the drum pieces gets effected. The auxiliary tracks volume level slider adjusts how much effect will be heard.
We often use these effect send and return loop setups for a better sounding, more believable, and easier to adjust way of adding effects. This makes good sense because the kick drum will only be “effected” by a percentage of its' whole. But what does that mean?
Well, in other words, "if you add the effects on the same track as the kick drum, it will be either too wet with the effect signal or too dry, or lacking the effects signal". Using an effects send and return loop allows for only a percentage of the kick drum to be effected. What is also cool is that the dry signal (original un-effected kick drum track) can be adjusted in volume too, and mixed into the song along with the wet signal! Both the “dry" and the "wet” signal can be mixed together, using send/returns loops, and the resulting sound is better and more superior to any other way of adding effects.
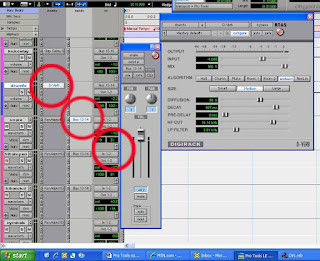
Here is an image of an Aux track being used as the effect send and return. The reverb is placed on one track, using a buss assign as its input. Each drum kit track that needs reverb uses a buss send to get the reverb, in a percentage of the reverb. Too much reverb would over power the sound of the song.

The image below better shows the loop, with the reverb dialouge box open, and the send buss tracks circled in red.
I have listened to drums from all sorts of recordings and I have decided that using an effects send/return loop is the best, easiest, and coolest way of adding effects to a drum kit. Well, the parts of the kit that need the extra adjustment that is.
I have mentioned only the kick drum up to now. That is because the kick drum usually needs a different effect than the rest of my kits components. A kick drum usually needs, for example, not only the delay mentioned above, but also some reverb too. This will be the next auxiliary send/return effects loop that we set up. Most of the kits pieces will “tap” into this reverb to some level or another.
I created a new aux tract for this reverb send/return loop. I went with a natural room sounding reverb for this because I wanted the kit to sound as if it was recorded in a studio setting.
I simply assigned a buss “send” from each piece of the drum kit that I wanted to add reverb to, being careful to assign the aux reverb tracks’ input as the same buss number (example: “buss 1”). I could now adjust the level of “send” from each of the kits’ pieces to the reverb loop. The amount of “send level” will reflect how much reverb is added to that piece of the kit. This is also called the “wet signal”.
Once again I can also adjust both the dry and wet levels together, and separately, to get a more natural sounding kit. I “sent” signal from the open hi-hat, closed hi-hat, snare, cymbals, and the kick drum to the reverb effects loop track. The output (volume) of the reverb track “send” loop reflects how much “wet” signal will be heard.
Stay tuned to the “Recording Weekly Blog”, because in the next segment I’ll go over how I used quantization to make the drum tracks feel even more human sounding. I will also touch on how I tuned up the bass tracks and how I got the guitar tracks to come alive.
Now is the time to subscribe to “Recording Weekly” by clicking on the appropriate chicklet located at the top right hand side of this blog. If that doesn’t sound appealing to you could simply add this blog to your favorites. This can be done in one simple click on the “Add to favorites” tab on you browser. Thanks for reading the Recording Weekly blog, and I hope that you enjoy the posts.


 Pick gaurds for the classic come in


 Two P90 pickups fuel the sound going out to the amps from the Virage guitars from Vox. These are very much like the