I downloaded the Celemony Melodyne plugin from their website, and after several full days of use I feel compelled to tell you all about it! I can not wait to spread the news about this plugin any longer!
The first thing that crossed my mind after downloading the plugin was that, it was actually up and running on my PC in what seemed like only a couple of minutes. What I mean by that is that Melodyne was downloaded, registered, and open in my DAW, and in full operation! This sort of speed is a first for me. I think that says something about a well designed product. There was not a single downloading or registration “burp, glitch, or hitch” at all what so ever.
The first thing that crossed my mind after downloading the plugin was that, it was actually up and running on my PC in what seemed like only a couple of minutes. What I mean by that is that Melodyne was downloaded, registered, and open in my DAW, and in full operation! This sort of speed is a first for me. I think that says something about a well designed product. There was not a single downloading or registration “burp, glitch, or hitch” at all what so ever.

The very next thing that I noticed was that I was actually using the Melodyne plugin without reading a single word from the manual. Again, I couldn’t help but to tell myself that with a well designed product comes an easy to use interface. This is definitely the case with the Melodyne plugin from Celemony.
I have since gone back and read the manual. I wanted to learn each and every feature that the Melodyne plugin has. I want to “suck the marrow out of the bone” and then learn how to use the tools in Melodyne to the best of their (and my) ability. I need to understand just what is possible with using the Melodyne plugin. I am smiling from ear to ear right now as I have indeed learned just what it is that I can do with the Melodyne plugin. What is it that I learned about what the Melodyne plugin is capable of? Everything that I hoped and yet so much more!
So, just what is Melodyne?
The Melodyne plugin is audio editing software that operates in a “plugin form”. Melodyne allows the user to edit recorded audio. Using the Melodyne plugin is a fast and easy way to place your off pitch, sour notes perfectly in tune.
But that is just the beginning of its features. I also learned that I could move audio around in time, in pitch, shorten or lengthen each note, and I could even adjust the volume levels of each note too! I am just getting started with the features and the endless possibilities of this powerful tool! One thing is for sure, and that is that I can’t stop tweaking my older material to near perfection. Melodyne is so darn fast and so easy to use that I can’t stop using it!
Let me explain the Melodyne plugin experience in a little more detail.
You use the Melodyne plugin in your DAW, as a tracks’ insert. The Melodyne plugin only works on the audio that you “place”, or load into it. Celemony claims that unaffected (dry) signals work the best, so edit your tracks with the Melodyne plugin first and then add your delays and reverbs. Just so that you all know, I am using a RTAS version of Melodyne in ProTools LE8, and it is working flawlessly.
The process of inputting audio into the Melodyne plugin is simple. Heck, even a caveman could do it!
One thing that became obvious to me is that you need to make sure that you “tell” the Melodyne plugin weather the audio that you are inputting is percussion or melodic in nature. When I started playing with some audio that I had first loaded into the Melodyne plugin, I couldn’t get the advanced editing features to do what I wanted them to. I found out that this was the reason why. I had placed vocal audio into the Melodyne plugin, and I had told it that it was percussion. I learn by making mistakes sometimes, what can I say?
In order to load your own audio into the Melodyne plugin, one need only to place your cursor of your DAW at the beginning of the selection that you want loaded into Melodyne. Then by simply clicking the “play” button in your DAW the loading process starts. When the section of your audio to be loaded has finished, clicking on your DAW’s stop button ends the loading process. The Melodyne plugin is now ready to work for you.
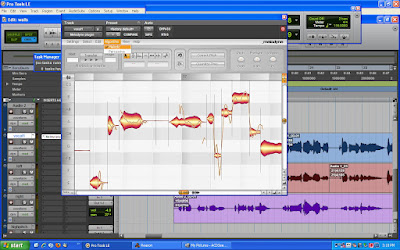
There is a quick pause while Melodyne converts the information into note “blobs”. These “blobs” are what make editing in Melodyne so easy. But the converting happens so fast that if you blink you will never see it happening. In fact, the entire process of loading audio into the Melodyne plugin is fast and easy.

In this above image of the Melodyne plugin in use, you can see the faint outline of the “blob”, just above the “actual blob itself”. Melodyne shows where your sour notes should be by using these simple “blob outlines”. This is a handy feature for tuning notes fast! The amount that your audio is off is shown in the little box at the top. How cool is that?
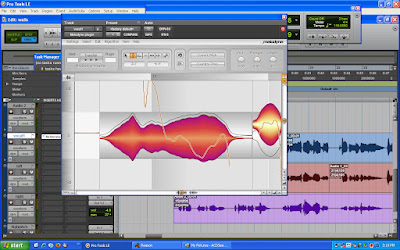
Moving the notes (blobs) with the pitch tool is as easy as dragging them with your mouse. You can use the auto snap to grid feature, or move the notes freehand style. Holding the Alt. key while moving the notes’ blip will allow for free movement. I found that by reading the “Cents” indicator, and getting it to “zero out” was a great way to place a note perfectly in tune.
The layout of the Melodyne plugin is very easy to take in and just as easy to understand. The beauty of using the Melodyne plugin is that you can go as deep with your editing as you want to. Or, if you are better than me at singing, you can keep your workflow as simple as you need it to be.
This is really a cool thing because sometimes I only need to change one little note here, or one single drum hit there, and I don’t want to spend a lot of time editing the finest little detail about these single notes.
I found out that I could (and did) load up a sour vocal, edit the vocal notes pitch to their correct pitch, and then transfer this edited material back into the DAW in a few minutes flat.
I did this editing without even downloading or reading the manual! So believe me, the Melodyne plugin is very easy to use, and it works and sounds amazingly good.


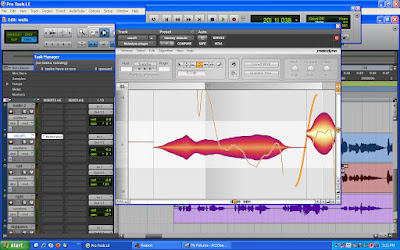
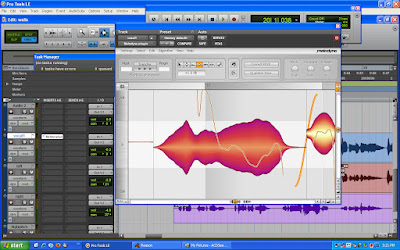
With the above two images, you can see that selecting and using the amplitude tool makes increasing or decreasing each note’s volume level a breeze. Clicking and dragging the mouse up or down is all you need to do. This is a great way to get a solo or even a vocal to sit evenly in the mix without compressing the snot out of it!
You can even use the Melodyne plugin to alter a notes timing troubles, quantize notes to a grid of time, or extend a note and/or shorten a note! The way in which the software is written does not make these altered notes sound funny at all, but instead they sound perfect. Do not expect to get any robotic sounding vocals from Melodyne, well, unless you want to make them. Even the stretching of a note sounds authentic!
All of these various types of edits (in Melodyne) can be made on a note-by-note basis, or by selection entire groups of notes! The Melodyne plugin separates the audio into regions, and I found it did a damn good job at separating words perfectly!
This “snap to grid” feature is great. Using your “Alt.” key along with the mouse allows exact placement of a note. The interface supplies a numerical readout of positive and negative cent values for each note as you place/move a “blob” on the Melodyne plugin interface. The ability to program in a key and then using the snap to feature made my editing workflow a joy to perform.
Click HERE to jump over to the Celemony website, and give the Melodyne plugin a new home in your studio. Using the Melodyne plugin will shave time from your workflow. I have not used a plugin before that offers such precision adjustments in volume levels, time, and pitch, and all with such speed and ease. Bravo! I give Melodyne the coveted “two guitar pics way up!”
HERE and HERE are some great and informative video demos from Celemony. These will get you “in the know” with speed.
Eric Oliver, on behalf of Expert Village, has also posted some great videos of himself using the Melodyne plugin! Here is the link to just some of them…….
Once more I need to thank you for stopping by. Make sure to either bookmark this blog or subscribe right now. I don’t want you to miss out on any of the exciting news, reviews, and how to’s that I post!

It was so easy I didn't even know what I was doing and it sounded great. I was able to fix those "flat bastards" in no time!!!
ReplyDeletegreat tools, vocal editing made easy
ReplyDeletesuch a great and informative article i have never seen such a great post with a wide knowledge great work keep it up thanks for sharing such agreat information
ReplyDeleteMelodyne 5 Crack
Melodyne Crack
Melodyne Serial Number
Respect and I have a tremendous give: How Much Should House Renovations Cost home renovation victoria
ReplyDelete