
This post is meant for the person that has some great songs recorded, and is looking to apply some better EQ prior to mastering their new song. I hope you enjoy this post, and if you do, please let me know about it. I will post more of these types of posts if folks like them.
These days, I get a lot of folks visiting this blog, and quite a few are looking for information about “additive and subtractive EQ procedures”. Today I would like to discuss some subtractive EQ procedure examples, focusing on High and Low Pass Filters.
But before I get too far into High and Low Pass Filters, let me stray off the beaten path for a moment, and give you some great advice. You can't put lipstick on a pig. Yep, that's right. That saying means that if your song is poorly recorded, then no amount of EQ will make it sound good. Go back now, and re-record those troubled tracks. A bad take is a bad take. I know because I have tried to “polish a turd” before, and it still looked like a turd.
Now that those harsh words were typed, let us get on with a quick lesson on frequency metering. “Why?”, you ask... Well, you can't remove any unwanted frequencies unless you know where they are located. I am not talking about a tracks gain level meter, or a master faders' gain meter, but a frequency meter.
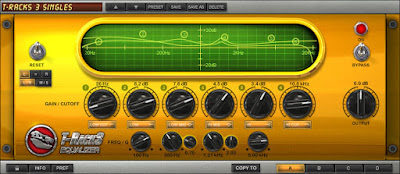
 IK Multimedia T-Racks S3 deluxe freq. meter
Placing a frequency meter across a single track shows just exactly what is happening, sonically, within that track. The frequencies (on most frequency meters) are laid out from left (lower frequencies), to right (higher frequencies). The more of a particular frequency present within a track, the more “bars” will be present in that section of the frequency meter. This has little to do with measuring a tracks' “gain” or “volume”, but, instead, measuring just where, and how much of each frequency are present within the track or tracks.
Another great idea is to put a frequency meter across a master fader. Solo each track to make additive or subtractive adjustments, and then “bring in” the other tracks, one at a time. Continue to watch the meter as you “un-solo” the tracks, and keep a sharp eye on just what is happening within the meter. Notice which tracks bring in that unwanted frequency boost. Which tracks, when played together, seem to send the levels “into the red”, so to speak. This is the best way to analyze the bass and a kick, together and separate, within your songs. This method also makes getting a great overall mix a snap.
First up, the High Pass Filter...
Let me be the first to tell you that a High Pass Filter is often called a Low Cut Filter. A Low Pass Filter is also called a High Cut Filter. These are examples of calling the same thing a different name. Let me explain why, as I detail what all of these filters are.
OK, let's say that today you are tracking a new song, consisting of 4 tracks, and all with just one microphone. The first track is a drum kit. The second is a guitar. The third track is a bass. The final track is a vocal track. Short and sweet, right?
However, without you even noticing, your neighbor is mowing the lawn today. There seems to be a motorcycle pass by your house every half hour too. Plus, you can't hear it, but passing trucks keep on hitting the same pot hole, and all of this creates some awful low end energy. Track after track, this low end frequency energy (or information) builds up, until the song is finished. Each track solo'd seems fine, but when played all together the low end just sounds muddy. This is from the build up of low end frequencies within your tracks.
What can you do to help avoid all of this? Simple! How about using High Pass Filters on each of your tracks?
 But what is a High Pass Filter?
High Pass Filters work on a simple premise. Basically, a High Pass Filter lets only the high frequency information pass through the filter un-touched. The low frequency information, however, is not allowed to pass through the filter. You tell, or set the filter to start cutting back at a particular “cut off” frequency. All that you need to do is to “tell” the High Pass Filter what this “cut off” frequency is. Then, all of the sound information higher than this setting (or cut off frequency) passes through the filter, and all of the sound information below this cut off frequency is cut. By the way, most of the low end rumble that we all cut out of out tracks can not be heard with our ears (roughly below about 20HZ or so). However, it adds up with each track and before long it begins to sound like “do-do”.
There is no particular “magic setting” for using High Pass Filters on your tracks. Each track is different! My advice is to start at the lowest “cut off” setting (so that the filter is not even working) and slowly move it up, until it sounds as you want it to. Solo the track as you do this, but make sure to bring in each of the other tracks, one by one, just to make sure that it still sits well in the mix. Know exactly what information you are removing. Study your tracks' frequencies with a meter: both before, and as you adjust the High Pass Filter. Solo the track as you adjust the settings of the High Pass Filter, but un-solo it just to double check that it sits right with all of the other tracks in your mix.
Using High Pass Filters has become a “must do” with me, as long as the track was recorded with a microphone. A lot of other instruments could benefit from High Pass Filters too, like bass, guitar, and snares. Problem is, too much High Pass Filter can be bad.
This brings me to the next topic for this post, the Low Pass Filter. Just think what the opposite of a High Pass Filter would be, and that is a Low Pass Filter. The idea, here, is to get rid of any unwanted, and pesky, high frequency audio. These high frequencies can certainly add up to spell disaster too, even perhaps more noticeably than low energy audio can. Tracks with “too much high frequencies” can sound distorted, or “tin like” and will just sound un-professional.
Once more, almost any track can be a good candidate for a Low Pass Filter. Most often I place a Low Pass Filter across acoustic guitar tracks, piano tracks, vocal tracks, and lots of other tracks too. The repeated truth, here, is that independently each track might sound rather acceptable. But, as each track that has too much high end adds up, what you will have is treble distortion!
I know this because I did this time and time again! I would blame the distortion on an over EQ'd hi hat, and then re-eq the hats. But once I played the freshly eq'd song the distortion was still there! Then I went through and listened to each track solo'd, but I just could not find the culprit. Sure enough, as I un-solo'd the track, I would hear it happening. What was going on?
The answer was that I was looking for was to add a simple Low Pass Filter to each of the tracks. This not only fixed the problem, but it even added some high end clarity. How, you ask? Well, without the distortion on the high end of things, the high end could now be heard more clearly.
So, what is the magic frequency that one should set the Low Pass Filter to “cut off” at (or start working at)? Well, I do not know. Each track, just as each song, is different.
With the track solo'd, I start at the highest frequency setting for the low pass filter, and then slowly start working it down. Once it sounds perfect, I stop. Next, I add in other “like tracks” one by one, to check that it still sounds good. Next, I like to add the other tracks and make sure it still works in the mix. Keep in mind that “like tracks” (like acoustic guitars for example), can have an additive eq effect when recorded with the same microphone, and so bringing them in first is a good idea.
Thanks for stopping by the Home Recording Weekly blog. Your input matters here, so please leave it here. You might also want to head over to my YouTube channel and check out some of my other video posts. Subscribing to the Home Recording Weekly blog is another great idea, as missing out on cool demos and reviews just sucks!
Awesome page! It was delivered in a nice simple to understand package, much appreciated!
ReplyDeleteI agree, great page.
ReplyDeleteHey thanks folks! It means a lot to me, and when people take a minute to post such thoughts it rocks me!
ReplyDeletelove it, have been hping a lot, need to try the lp next! thanks
ReplyDeleteThank you! Very clear.
ReplyDeleteThanks for the great feedback!
ReplyDeleteThis is a great!!! article for someone with little mixing experience. The low and high cut is something I never understood what it would do or how to apply it. Great info!!!
ReplyDeleteThanks once more! I just try to share what I learn as I learn it!
ReplyDeleteTwo questions:
ReplyDelete1. So, if I'm recording a solo woodwind instrument in a town-house with drywall and hard-wood floors, I should use the high-cut (low-pass) filter? 2. Is it better to use the filter that comes with the recording device (Zoom h4n) or do it in post-processing on the computer?
Thanks!
Robin, I sent you an email. Did you get it?
ReplyDeleteYes I got it, I'm slow with e-mail.
DeleteAre you kidding? Thanks for the reply!!! This blog is awesome!
I'm really frustrated because what I hear when I play, and what comes out of the recording are very different. But if I listen carefully, just when I finish a note, there is a really tight echo: I'm guessing the low-pass filter would cut those out.
I don't know why I would want a low-cut filter on the mic: seems to me it's the higher frequencies resulting from bouncing off the wall a hundred times that brighten my sound and buzzify it a bit, no?
Again, thanks for the 2nd e-mail. Your blog RULES!.... just need to figure out how to "follow" it in Blogger or get RSS feeds on it....
DeleteWow, thanks a ton. Mixing is something I struggle with when making hip hop beats.
ReplyDeleteSubtractive mixing makes so much more sense to me. I see what I was doing wrong.
It's like a math problem. I understand it.
MizzHitZ You have just gotten what most folks dont. You are now well on your way. Most tracks need to be cut, and not boosted! Use EQ to make room for the rest of the mix. Check out my review of "Re think mixing" and get it, and Joe Gilders "Understanding compression and eq" too. Check out my reviews at WWW.HomeRecordingWeekly.com
ReplyDeleteThanks, great post.
ReplyDelete